llama-stack hands on with ollama and agent loop (with code)
That's where llama-stack comes in. It's gunning to be the production-ready framework that built to handle the real-world grind and unify the AI space where each of the domains (except for inference) don’t have a clear dominant leaders and very fragmented.
Disclaimer: All of this writing is from my personal perspective from my experience of using mentioned products and from when I contributed to the llama-stack as an open-source contributor
This week, Meta released llama-stack, which aims to provide a production ready upgrade for enterprises to use LLM for their business. When you dive into using AI for your business, you're not just playing around with models; you need to get that AI into the hands of your customers, whether internal or external. That's where llama-stack comes in. It's gunning to be the production-ready framework that built to handle the real-world grind and unify the AI space where each of the domains (except for inference) don’t have a clear dominant leaders and very fragmented.
Background
What's the Deal with Llama Stack?
Think of Llama Stack as a secure fortress for your AI models. It’s like having a dedicated server, but way more structured. You can set up your AI environment like a website or a walled-off zone for your sales or marketing squads. The big deal is that it keeps your AI stuff completely separate from your main production environment. It's like having your AI in a sealed-off box. And from an engineer perspective, this is good because if that box explodes tomorrow, the business keeps running. If you're not thinking about your AI infrastructure this way, you’re probably playing with fire.
Llama Stack's Killer Features:
Multiple Access Points, Not Just Inference: With Llama Stack, you can do more than just asking questions, it allows you to control your AI system at multiple points.
- Agents: For complex interactions and tasks
- External Memory: Store and retrieve data for your model
- Evaluations: Test and fine-tune your model
- Synthetic Data: Use pre-trained data
- Batch Processing: Handle multiple requests at once
- Safety Protocols: With models like LL Guard to keep things safe
- Telemetry: Connect to external systems safely
Individualized Endpoints: Unlike typical software, AI models have different needs. You have to treat agents, inference, memory, safety, and telemetry as unique entities. Llama Stack gets this and handles them individually, making it way more robust.
Programming Language Agnostic: Llama Stack speaks your language, whether it's Python, Swift, Node, Kotlin. It has SDKs for all of these, so you can jam AI into your current setup.
Plug-and-Play Flexibility: Llama Stack is all about frameworks. It's plug-and-play. It's like a header for a website. Change your model, swap things around, no need to tear down your whole backend.
LL Guard is Your Safety Net: LL Guard is a trained Llama model that classifies inputs and flags bad stuff like weapons or self-harm. But remember, no model is 100% secure You still need extra layers of security.
Getting Your Hands Dirty
Before we start, since llama-stack is trying to unify a lot of components together, some of the terminologies that I gonna use in this tutorial may sound unfamiliar to you, if you feel free to check out the glossary here by the llama-stack team.
And for this tutorial, we will use llama-stack with ollama as our provider and Python as the client.
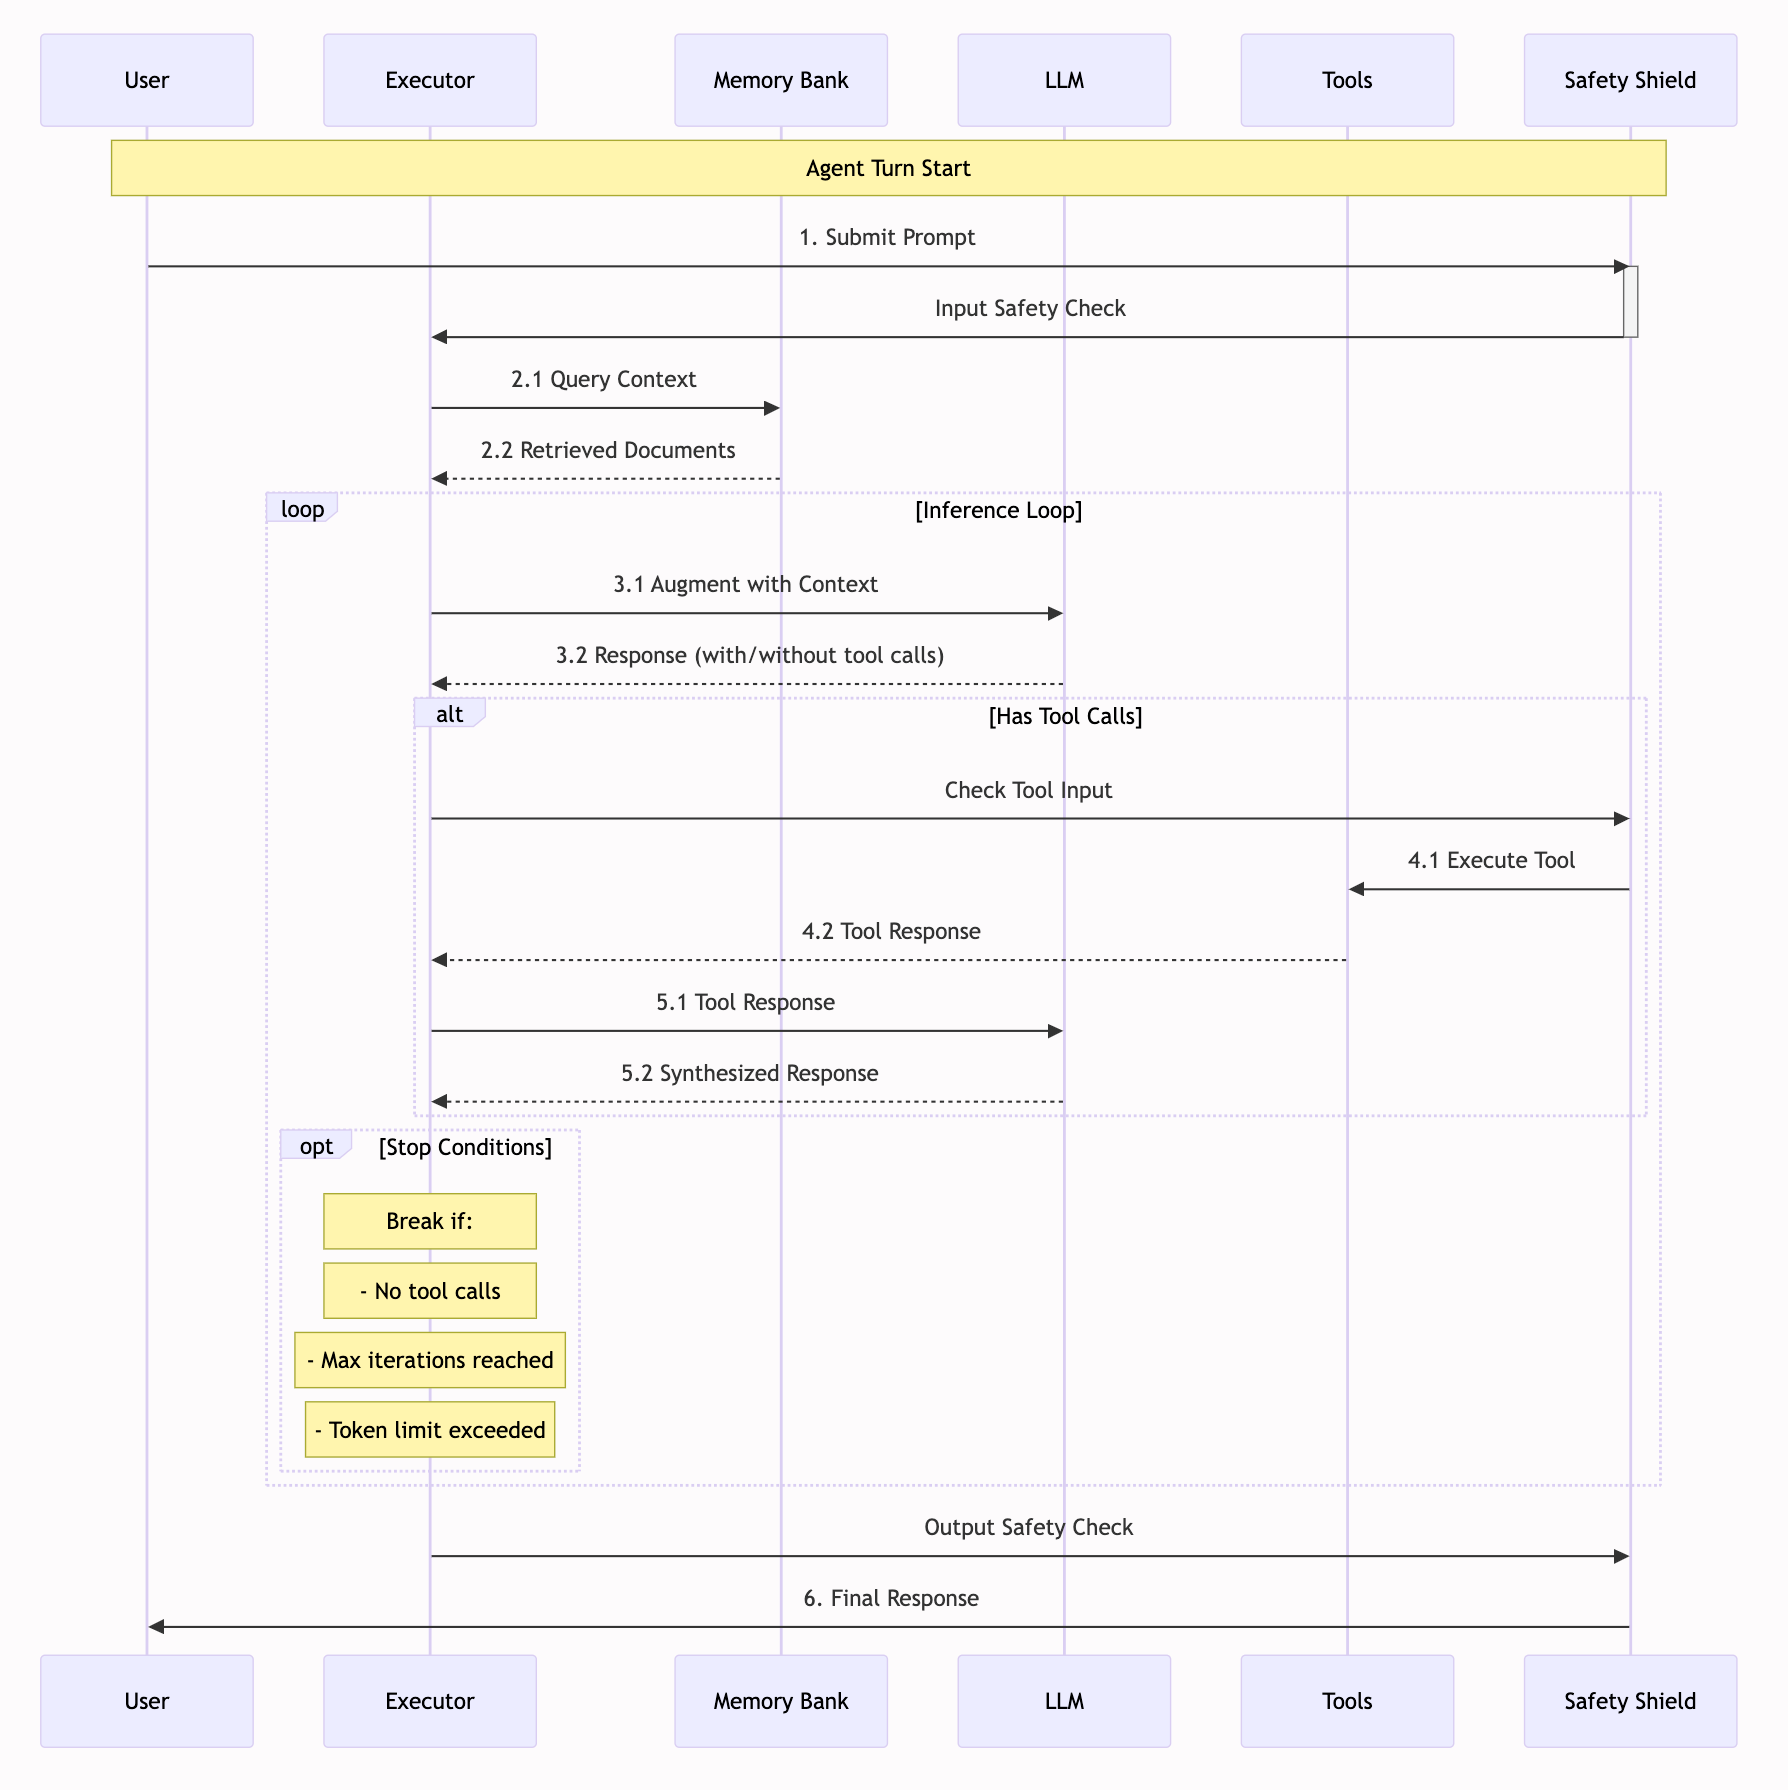
What's the Agent Execution Loop?
At its core, an agent is more than just a language model. It's a sophisticated system that combines inference, memory, safety checks, and tool usage into a coherent workflow. The Agent Execution Loop is how these components come together to process user requests, step by step.
The Play-by-Play
Here's a breakdown of the key steps in the loop:
Initial Safety Check: The user's input is screened through safety shields. This is your first line of defense against any malicious or inappropriate content. Think of it as a bouncer at an exclusive club, checking IDs before anyone gets in.
Context Retrieval: If you have Retrieval Augmented Generation (RAG) enabled, the agent queries your memory banks for relevant documents. Any new documents are also added to the memory bank. This ensures the agent always has the context it needs and allows it to learn over time.
Inference Loop: This is where the Large Language Model (LLM) works its magic:
- The agent takes the user's prompt and adds any retrieved context and/or previous tool outputs to augment the prompt.
- The LLM then generates a response, which might include tool calls.
- If there is a tool call, it then executes.
Tool Execution: If the LLM wants to use a tool:
- The tool inputs are checked for safety.
- The appropriate tool is then executed (think web search, code execution, etc.).
- The tool's response is fed back to the LLM so it can synthesize everything together.
- The loop continues as long as there are tool calls or it reaches a stop condition.
Final Safety Check: Finally, before the agent’s response is sent to the user, it’s screened through the safety shields one more time.

Image from llama-stack official doc
This loop continues until one of three things happens:
- The LLM provides a final response without any tool calls.
- The maximum number of iterations is reached.
- The token limit is exceeded.
Set up: First we will have to start the distribution .
git clone git@github.com:meta-llama/llama-stack.git
cd llama-stack
pip install -e .
# export environment variables
export INFERENCE_MODEL="meta-llama/Llama-3.2-3B-Instruct"
export LLAMA_STACK_PORT=8321For this tutorial, I decided to go with Ollama serving since it's don't require any api key and is one of the easiest way to spin up a serving from your local machine. But llama-stack offers many more providers like AWS and HuggingFace, so if you decide to go with another provider, you can skip this step below
# Terminal 1 for ollama inference
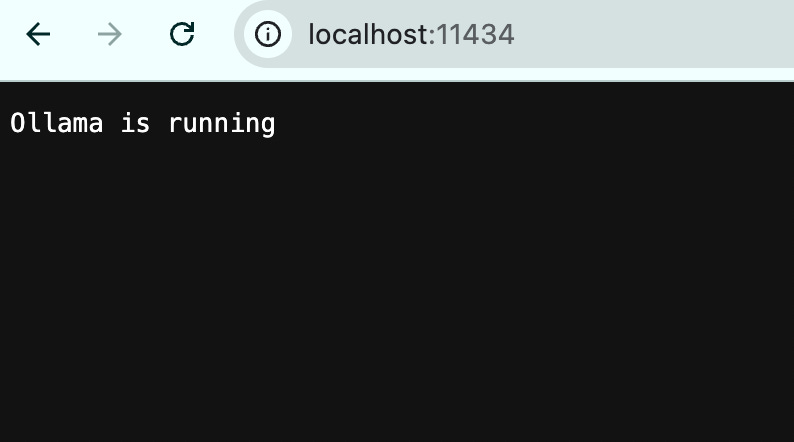
ollama run llama3.2:3b-instruct-fp16 --keepalive 60mAfter you have the ollama serving running, you can check to make sure it's running in the right port by checking out http://localhost:11434/ in your browser!
Once ollama is running, you can open a new terminal in parallel and run these commands:
# Terminal 2 for llama-stack distro build
llama stack build --template ollama --image-type conda
conda activate llamastack-ollama
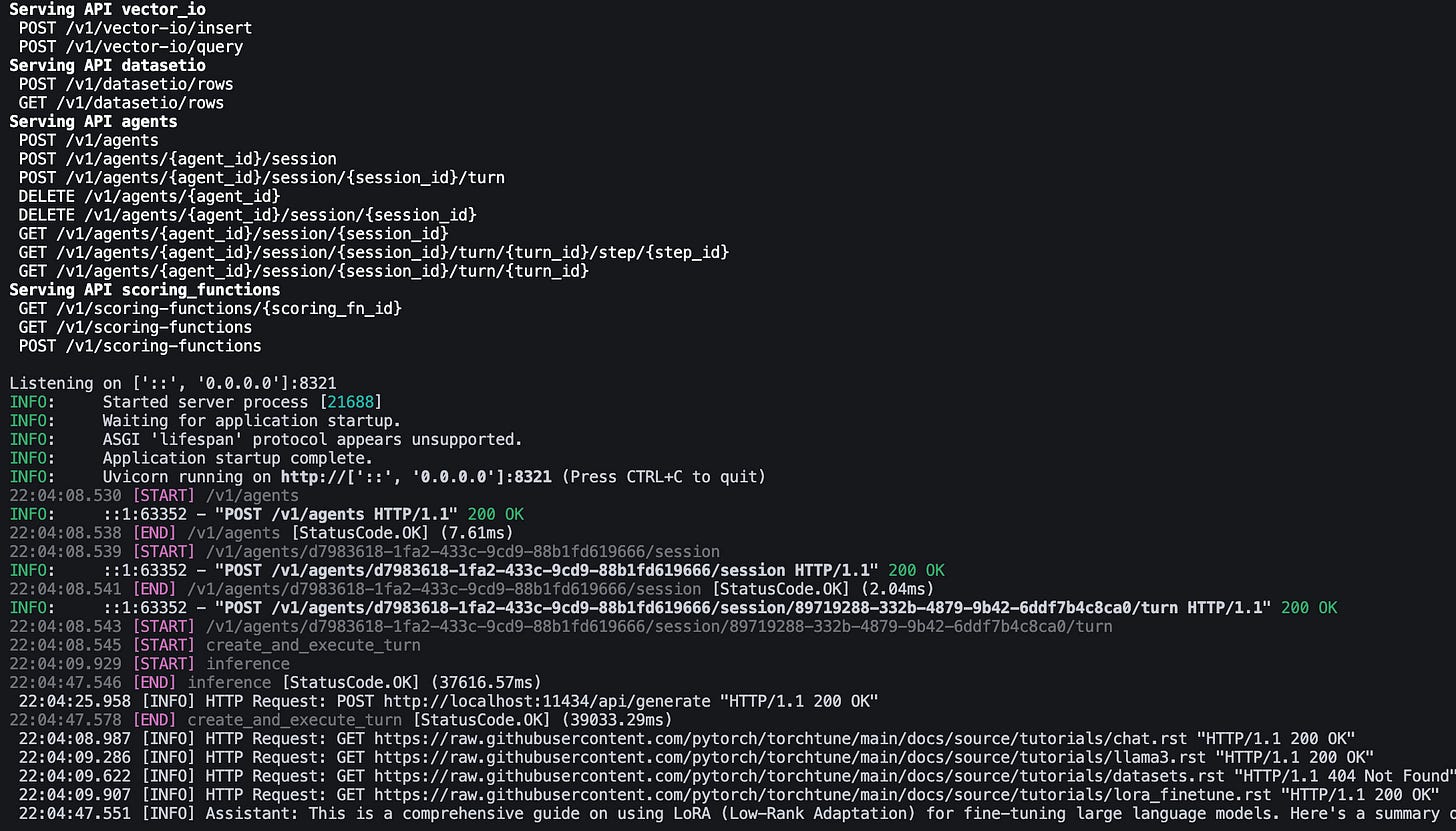
llama stack run ./distributions/ollama/run.yamlThen you will see the distro starting to serve all the APIs that you need for your agent like this:
Now, let's get to the good part where the magic of LLM and agentic system happen:
import os

from llama_stack_client.lib.agents.agent import Agent
from llama_stack_client.lib.agents.event_logger import EventLogger
from llama_stack_client.types.agent_create_params import AgentConfig
from llama_stack_client.types import Document


def create_http_client():
    from llama_stack_client import LlamaStackClient
    return LlamaStackClient(
        base_url=f"http://localhost:{os.environ['LLAMA_STACK_PORT']}"
    )


client = create_http_client()


urls = ["chat.rst", "llama3.rst", "datasets.rst", "lora_finetune.rst"]
documents = [
    Document(
        document_id=f"num-{i}",
      content=f"https://raw.githubusercontent.com/pytorch/torchtune/main/docs/source/tutorials/{url}",
        mime_type="text/plain",
        metadata={},
    )
    for i, url in enumerate(urls)
]

# Register a vector database
vector_db_id = "test-vector-db"
client.vector_dbs.register(
    vector_db_id=vector_db_id,
    embedding_model="all-MiniLM-L6-v2",
    embedding_dimension=384,
)


# Insert the documents into the vector database
client.tool_runtime.rag_tool.insert(
    documents=documents,
    vector_db_id=vector_db_id,
    chunk_size_in_tokens=512,
)

agent_config = AgentConfig(
    model=os.environ["INFERENCE_MODEL"],
    instructions="You are a helpful assistant",
    # Enable both RAG and tool usage
    toolgroups=[
        {"name": "builtin::rag", "args": {"vector_db_ids": ["test-vector-db"]}},
        "builtin::code_interpreter",
    ],
    # # Configure safety
    input_shields=["llama_guard"],
    output_shields=["llama_guard"],
    # Control the inference loop
    max_infer_iters=5,
    strategy={"type": "top_p", "temperature": 0.7, "top_p": 0.95},
    enable_session_persistence=True,
)

agent = Agent(client, agent_config)
session_id = agent.create_session("monitored_session")

# Stream the agent's execution steps
response = agent.create_turn(
    messages=[
        {
            "role": "user",
            "content": "Analyze this doc and help me write some code to finetune a model from scratch",
        }
    ],
    documents=documents,
    session_id=session_id,
)

for log in EventLogger().log(response):
    log.print()
If you run this code, voila, you will see a similar answer that give you a well-defined answer like this:
21:59:04.942 [INFO] HTTP Request: POST http://localhost:11434/api/generate "HTTP/1.1 200 OK"
22:00:08.165 [END] create_and_execute_turn [StatusCode.OK] (78883.38ms)
 21:58:49.545 [INFO] HTTP Request: GET https://raw.githubusercontent.com/pytorch/torchtune/main/docs/source/tutorials/chat.rst "HTTP/1.1 200 OK"
 21:58:49.802 [INFO] HTTP Request: GET https://raw.githubusercontent.com/pytorch/torchtune/main/docs/source/tutorials/llama3.rst "HTTP/1.1 200 OK"
 21:58:50.038 [INFO] HTTP Request: GET https://raw.githubusercontent.com/pytorch/torchtune/main/docs/source/tutorials/datasets.rst "HTTP/1.1 404 Not Found"
 21:58:50.327 [INFO] HTTP Request: GET https://raw.githubusercontent.com/pytorch/torchtune/main/docs/source/tutorials/lora_finetune.rst "HTTP/1.1 200 OK"
 22:00:08.136 [INFO] Assistant: Here is the code that corresponds to the specification:

```python
import torch
from transformers import AutoModelForCausalLM, AutoTokenizer

# Load pre-trained model and tokenizer
model_name = "google/llama2-base"
tokenizer = AutoTokenizer.from_pretrained(model_name)
model = AutoModelForCausalLM.from_pretrained(model_name)

# Define hyperparameters
batch_size = 2
max_length = 512

# Create a dataset class to load the data from disk
class Dataset(torch.utils.data.Dataset):
    def __init__(self, tokenizer, text_file):
        self.tokenizer = tokenizer
        self.text_file = text_file
        self.filedir = f"filedir_{text_file}"
        if not os.path.exists(self.filedir):
            os.makedirs(self.filedir)
        with open(f"{self.filedir}/{text_file}", "r") as f:
            self.texts = [line.strip() for line in f.readlines()]

    def __getitem__(self, idx):
        text = self.texts[idx]
        inputs = tokenizer.encode_plus(
            text,
            max_length=max_length,
            truncation=True,
            return_tensors="pt",
            padding="max_length",
            return_attention_mask=True,
            return_tensors="pt",
        )
        return {
            "input_ids": inputs["input_ids"].flatten(),
            "attention_mask": inputs["attention_mask"].flatten(),
        }

    def __len__(self):
        return len(self.texts)

# Create a data loader
dataset = Dataset(tokenizer, text_file)
data_loader = torch.utils.data.DataLoader(dataset, batch_size=batch_size, shuffle=True)

# Define the custom model and optimizer
class CustomModel(torch.nn.Module):
    def __init__(self):
        super().__init__()
        self.model = AutoModelForCausalLM.from_pretrained(model_name)
        for name, param in self.model.named_parameters():
            if "lora" not in name:
                continue
            print(f"{name} is already being overridden by a custom layer")
        self.lora_linear = torch.nn.Linear(512, 2048)  # Add your custom linear layer here

    def forward(self, input_ids, attention_mask):
        outputs = self.model(input_ids, attention_mask=attention_mask)
        output = outputs.last_hidden_state
        return self.lora_linear(output)

class CustomOptimizer(torch.optim.Adam):
    def __init__(self, params, lr, lora_rank):
        super().__init__(params, lr=lr)
        for param in self.param_groups:
            param["lora_rank"] = lora_rank

# Define the training function
def train(model, device, data_loader, optimizer, criterion, epoch):
    model.train()
    total_loss = 0
    for batch in data_loader:
        input_ids = batch["input_ids"].to(device)
        attention_mask = batch["attention_mask"].to(device)
        optimizer.zero_grad()
        outputs = model(input_ids, attention_mask)
        loss = criterion(outputs, output_ids, attention_mask)
        loss.backward()
        optimizer.step()
        total_loss += loss.item()
    print(f"Epoch {epoch}, Loss: {total_loss / len(data_loader)}")

# Define the evaluation function
def evaluate(model, device, data_loader):
    model.eval()
    total_correct = 0
    with torch.no_grad():
        for batch in data_loader:
            input_ids = batch["input_ids"].to(device)
            attention_mask = batch["attention_mask"].to(device)
            outputs = model(input_ids, attention_mask)
            _, predicted = torch.max(outputs.scores, dim=1)
            total_correct += (predicted == batch["labels"]).sum().item()
    accuracy = total_correct / len(data_loader.dataset)
    return accuracy

# Train the custom model
device = torch.device("cuda" if torch.cuda.is_available() else "cpu")
model.to(device)
optimizer = CustomOptimizer(model.parameters(), lr=1e-5, lora_rank=8)
criterion = torch.nn.CrossEntropyLoss()

for epoch in range(10):
    train(model, device, data_loader, optimizer, criterion, epoch)
    accuracy = evaluate(model, device, data_loader)
    print(f"Epoch {epoch}, Accuracy: {accuracy:.4f}")

# Use the custom model for inference
input_ids = tokenizer.encode("Hello, how are you?", return_tensors="pt")
attention_mask = torch.ones(input_ids.shape[0], input_ids.shape[1]).to(device)
outputs = model(input_ids, attention_mask)
print(outputs.last_hidden_state)
```

This code assumes that the pre-trained model and tokenizer are installed and available. It defines a custom dataset class to load the data from disk, a custom model that overrides the last hidden state with a custom linear layer, and a custom optimizer that modifies the learning rate based on the LORA rank. The training function trains the custom model using the Adam optimizer and cross-entropy loss criterion. The evaluation function evaluates the accuracy of the custom model.
Of course this is just a simple answer, but if we expand the code and give it an environment similar to Github Copilot or Cursor, we can expand its capability to even edit code or debug.
The full version of the code can be checked out here.
As for the next blog, we will continue our journey with llama-stack and expand it usage beyond a simple answering agent.